Sunday, November 12, 2017

Slide transition

Add, change, or remove transitions between slides

Slide transitions are the animation-like effects that occur when you move from one slide to the next during a presentation. You can control the speed, add sound, and customize the properties of transition effects.

Add or change a slide transition

  1. In the Thumbnail Pane, click the slide where you want to apply or change a transition. The transition setting dictates how that slide enters and the preceding slide exits – in our example below, if you add a transition to slide 3, it dictates how slide 2 leaves and slide 3 enters
  2. On the Transitions tab, find the effect that you want in the Transition gallery. Click the More button Button image to see the entire gallery. Click the effect that you want for that slide to select it or to see a preview.
  3. Click Effect Options to change how the transition occurs – for example, what direction the slide enters from.
  4. Optional:
    • To set how fast the transition goes, enter a time in the Duration box. Set the number higher to make the transition go slower. 
    • To add sound to your transition, select a sound in the Sound box, or select Other Sound to choose a sound from your computer.
    • If you want all slides in the presentation to transition the same way, click Apply To All.
  5. Click Preview to see what the transition looks like with all the settings.

Remove a transition

Remember that a transition applies to a slide’s entrance, not how it exits. So if you want to remove the exit effects for slide 2, remove the transition from slide 3.
  • Click the slide that you want to have no transition. Then on the Transitions tab, in the Transitions gallery, click None.

  • To remove transitions from all slides, select all the slides in your presentation (Ctrl+A) in the Thumbnail pane, and then on the Transitions tab, in the Transitions gallery, click None.

Inserting an Image


Insert a picture in PowerPoint

When you want to make your PowerPoint presentation more interesting, you can insert pictures, photos, clip art, or other images to your slide show from your computer or from the Internet. You can add single or multiple images onto a slide, the slide master, or to the background.

Insert a picture from your computer on your slide

  1. Click where you want to insert the picture on the slide.
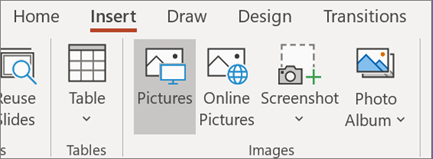
  2. On the INSERT tab, in the Images group, click Pictures.
    On the Insert tab, click Pictures.
  3. In the dialog box that opens, browse to the picture that you want to insert, click that picture, and then click Insert.
    TIP: If you want to insert multiple pictures at the same time, press and hold the Ctrl key while you select all the pictures you want to insert.

Insert a picture from the web on your slide

  1. Click where you want to insert the picture on the slide.
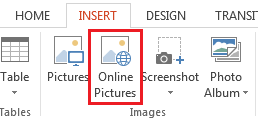
  2. On the INSERT tab, in the Images group, click Online Pictures.
    On the Insert tab, click Online Pictures.
  3. (PowerPoint 2016) Ensure Bing is showing on the left in the drop-down list of sources to search. In the box, type what you are searching for, and press Enter.
    (PowerPoint 2013) In the Bing Image Search box, type what you are searching for, and press Enter.
    Use the SizeTypeColorLayout, and licensing filters to adjust the results according to your preferences.
  4. Click the picture you want to insert, and click Insert.
    TIP: If you want to insert multiple pictures at the same time, press and hold the Ctrl key while you select all the pictures you want to insert.
    TIP: After you insert a picture, you can change its size and position. To do so, right-click the picture, and click Format Picture. You can then use the Format Picture tools that are on the right of your slide.

Inserting clip art

Unlike some earlier versions of PowerPoint, PowerPoint 2013 and later do not have a clip art gallery. Instead, use Insert > Online Pictures to find and insert clip art using the Bing search tool.
On the Insert tab, click Online Pictures.

Insert a picture into the slide master

If you want a picture to appear on every slide of a specific type in your PowerPoint template, add it to the slide master. 

Insert a picture into the background

If you want a picture to appear as background without affecting all slides in a Master, change the background settings for the slide. Learn more at 

Inserting Shapes in PowerPoint


Add shapes

You can add shapes, such as boxes, circles, and arrows, to your documents, email messages, slide shows, and spreadsheets. To add a shape, click Insert, click Shapes, select a shape, and then click and drag to draw the shape.
After you add one or more shapes, you can add text, bullets, and numbering to them, and you can change their fill, outline, and other effects on the Format tab.
TIP: You can add individual shapes to a chart, or add shapes on top of a SmartArt graphic to customize the chart or the graphic. 

Add a shape in Excel, Outlook, Word, and PowerPoint

  1. On the Insert tab, click Shapes.
    Insert Shapes button in Excel
    Insert Shapes button
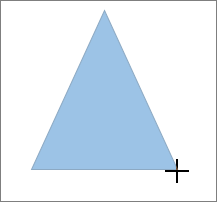
  2. Click the shape you want, click anywhere in the workspace, and then drag to place the shape.
    Drawing a shape
    To create a perfect square or circle (or constrain the dimensions of other shapes), press and hold Shift while you drag.

Add a shape in Project

To follow these steps, you need to open or create a report. To do that, on the Report tab, click Recent to open an existing report, or click More Reports to select a report from the list in the Reports dialog box or create a new report.
  1. In the open report, on the Design tab, click Shapes.
    Insert Shapes button
  2. Click the shape you want, click anywhere in the workspace, and then drag to place the shape.
    Drawing a shape
    To create a perfect square or circle (or constrain the dimensions of other shapes), press and hold Shift while you drag.

Add text to a shape

Insert a shape, or click an existing shape, and then enter text.
  1. Right-click the shape and click Add Text or Edit Text, or just start typing.
    NOTE: The text that you add becomes part of the shape — if you rotate or flip the shape, the text rotates or flips also.
  2. To format and align your text, click the Home tab, and then choose options from the FontParagraph, or Alignment groups, depending on the program you're using and what kind of formatting you want to apply. (Text formatting options are limited in Project.)

Change from one shape to another shape

NOTE: These commands aren't available in Project.
  1. Click the shape you want to change.
    To change multiple shapes, press Ctrl while you click the shapes that you want to change.
  2. On the Format tab, in the Insert Shapes group, click Edit Shape Edit Shape button , point to Change Shape, and then click the new shape that you want.

Add the same shape multiple times

If you need to add the same shape repeatedly, you can do so quickly by using Lock Drawing Mode.
NOTE: Instead of adding individual shapes to create a drawing, you might want to create a smartArt graphic. In a SmartArt graphic, the arrangement of the shapes and the font size in those shapes is updated automatically as you add or remove shapes and edit your text.
  1. On the Insert tab, click Shapes.
    Insert Shapes button in Excel
    Insert Shapes button
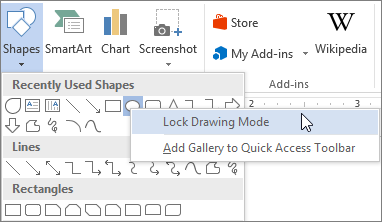
  2. Right-click the shape you want to add, and then click Lock Drawing Mode.
    Lock Drawing Mode
  3. Click anywhere in the workspace, and then drag to place the shape.
  4. Repeat step 3 to add the shape as many times as you like.
    TIP: To create a perfect square or circle (or constrain the dimensions of other shapes), press and hold Shift while you drag.
  5. After you add all the shapes you want, press Esc.

Add a bulleted or numbered list to a shape

NOTE: This feature isn't available in Project.
  1. Select the text in the shape that you want to add bullets or numbering to.
  2. Right-click the selected text, and on the shortcut menu, point to Bullets, and then click Bullets and Numbering.
  3. Do one of the following:
    • To add bullets, click the Bulleted tab, and then choose the options that you want.
    • To add numbering, click the Numbered tab, and then choose the options that you want.

Add a Quick Style to a shape

Quick Styles let you apply a style to your shape with one click. You'll find the styles in the Quick Style gallery. When you rest your pointer over a Quick Style thumbnail, you can see how the style affects your shape.
  1. Click the shape you want to change.
  2. On the Format tab, in the Shape Styles group, click the Quick Style you want to use.
    Shape Styles group

Delete a shape
  • Click the shape that you want to delete, and then press Delete. To delete multiple shapes, press Ctrl while you click the shapes that you want to delete, and then press Delete.

SmartArt in PowerPoint

SmartArt is a new type of graphical tool included in the latest versions of Word. SmartArt is, basically, a way to make organized presentation art. (Some folks think that SmartArt was created as a tool primarily for PowerPoint.) It is suitable for "organizational" types of artwork, such as org charts and process lists.

Working with SmartArt

SmartArt lets you add shapes, color and emphasis to your text. Think of it as turning your text into a diagram, flow-chart, organizational chart or just making a list a little more exciting. This lesson will discuss how to make changes to your SmartArt by adding more shapes, changing the color, changing the text and converting a bullet list into a SmartArt graphic.
But before we begin, let's review how to add a SmartArt graphic to your slide:
  1. First, select the Insert menu on the ribbon.
  2. And then, under the Illustrations grouping of commands, click on the SmartArt command.
  3. A list of SmartArt categories with several different layouts to choose from will appear. Select the layout you want and click OK.
Now, let's continue and learn about making changes to our SmartArt.

Adding More Shapes

You will find it necessary to add more shapes to your SmartArt. For example, if you wanted to create an enhanced version of an agenda, you could use SmartArt. This would replace the typical bullet list of agenda items.
Imagine you are creating a presentation for an upcoming meeting, and a couple of days before, you decide to add a short, team-building exercise. You need to add another list item, or shape, to your SmartArt.
So, here are the steps:
  1. First, click on the SmartArt graphic and select an existing shape closest to where you want to add the new shape.
  2. In the ribbon, under the SmartArt Tools, click on the Design menu.
  3. In the Create Graphic grouping of commands, click on the pick-list icon, next to the Add Shape icon.
    • To insert a shape at the same level as the selected shape but following it, click on Add Shape After.
    • To insert a shape at the same level as the selected shape but before it, click on Add Shape Before.
    • To insert a shape one level above the selected shape, click on Add Shape Above.
    • To insert a shape one level below the selected shape, click Add Shape Below.
To quickly add a shape that matches those in your SmartArt graphic, you can click directly on the Add Shape button. This will, by default, add a shape directly to the right of the shape you have selected.
And here is something to keep in mind: depending on the layout you choose for your SmartArt graphic, all options may not be enabled. For example, if your layout choice goes from left to right or right to left, you may not see the Add Shape Above or Add Shape Below, since your layout choice does not have shapes above or below.

Changing the Color

Okay, let's move on to changing the color. So, the easiest way to quickly change the look of your SmartArt is to change the color. This can happen with just a few clicks of your mouse. Select the SmartArt graphic, and in the SmartArt Tools, click on the Design menu. In the ribbon, go to the SmartArt Styles grouping of commands and click on Change Colors.
PowerPoint offers several different color variations. You can choose to change your SmartArt to multi-color or choose any of the 1-color combinations. This is the easiest way to quickly add some variety to your slide and your SmartArt graphic.

Slide transition